FAQs

A : Our moulding Gel is a 100% skin safe, and is non-toxic, biodegradable and safe for skin, including for babies or delicate skin. It is specially formulated to create amazingly detailed, high quality hand castings whilst being gentle and safe.

A : Depending on the kit type, we usually recommend having an electric mixer and mixing bowl or two, baby oil and scissors on hand. Any other extra items will be easy to find around the home and are listed in the kit instructions and on the product page before purchase.

A : You are advised to make the sculpture when your baby is asleep to limit movements when you are making a cast of his or her hand or foot. Avoid making a sculpture with your baby at a time when he is tired, hungry or agitated.

A : Our special moulding gel sets quickly, which is perfect for working with young children. If you need a little more working time, you can use cooler water. Warmer water will make the mould set quicker. If you don’t have a thermometer handy, just use cold water. We normally suggest avoiding casting on really hot days as the room temperature will also make the mould set more quickly.

A : Only one sculpture can be made from each mould. Stone is poured into the mould and is then carefully peeled away to reveal your sculpture inside. This means the mould is unusable once removed, but it means every casting is totally unique!

A : You must read all the instructions before starting so that you know beforehand what the different stages are, and you must follow all the directions exactly. It is important to prepare all the elements required before you start making the sculpture. When you start step 1, we advised to keep everyone nearby so once the moulding is mixed you can dunk hands. Top tips: The moulding gel (Step 1) sets quickly so we recommend you work fast and with cooler water giving you more time. Have your pose ready, dunk hands in and slowly lift out and put back. This helps to minimize air bubbles.

A : We include simple step-by-step instructions but for whatever reason your casting didn’t turn out the way you wanted, we are able to send you refill packs to try again.

A : Gently and gradually pour the plaster into the mould. To avoid air bubbles remaining at the bottom of the cast, turn the mould in different directions and tap the edges to help air bubbles escape.

A : Your sculpture will dry to a brilliant Classic White finish. If you would like to paint your sculpture, it is essential to ensure it is dry, and you have seal it with diluted PVA glue. 1 part glue to 4 parts water. We recommend leaving the cast to dry for 2 weeks before sealing, then an additional week before painting.

We recommend using acrylic paints on your sculpture, as these are easy to apply at home, are usually water based and so are safe to use.

You can alternatively use spray paints, however due to the ease of drips and also the fumes, we do not like to recommend them as our first choice. However ‘Rust-o-leum’ are a brand which have a range designed for plaster and ceramics, should you prefer to try spray paint.

A : Due to the nature of this product, Today & Forever do not accept refunds or exchanges if the tamper proof seal is broken on the bucket. Today & Forever take no responsibility for sculptures that do not turn out correctly due to user not following instructions.

Top 5 Problems

We think it’s important that you have an idea of what the most common problems with hand casting kits. You love the idea of making a cast but are worried about what might go wrong. When you’re searching online for hand casting kits, all you see are perfect results and claims from sellers about how easy their kits are to use. You may be particularly worried because you want to make a casting to mark a special occasion. This might be a wedding or a special anniversary. Or you might need to make a cast with a loved one who is elderly or very unwell. Sometimes you only get one shot at making this lasting memory, so you want to be sure it’s going to work. We know it can be hard to find information about what might go wrong, so here we’re going to explain the top 5 most common problems with hand casting kits and how to avoid them (or fix them!)

Problem 1 : Casting Gel Sets Too Quickly

Occasionally we hear from customers who haven’t been able to get their hands into the bucket before the casting mixture has started to set. That is obviously super frustrating so here are our top tips.

How to Avoid Your moulding Gel Setting Too Quickly

Temperature Moulding gel sets more quickly when the water or room temperature is warmer, so use cold water from the tap to give yourself as much time as possible to get it mixed. Using cold water will mean you need to keep still for longer so make sure you find a comfortable position to hold before you start mixing. If possible, avoid making your casting on any particularly hot days!

Mixing You should always use an electric mixer as getting our premium moulding gel mixed with a hand whisk or a wooden spoon is going to be incredibly difficult before it starts to set.

Get Help Get a friend or family member to pour in the bags of product while you mix, this will mean you can just keep mixing and will save you time.

Adding the powder Add half a bag of moulding gel at a time and mix it fairly slowly until it’s just absorbed into the water before adding the next half bag. Once all the powder is absorbed, turn up the electric mixer to full speed and mix until smooth. You can see our video demonstrations on Facebook

Adding the powder Add half a bag of moulding gel at a time and mix it fairly slowly until it’s just absorbed into the water before adding the next half bag. Once all the powder is absorbed, turn up the electric mixer to full speed and mix until smooth. You can see our video demonstrations on Facebook.

How to Fix It

If you’ve used one of our kits and followed all our top tips but still didn’t manage to get it mixed in time, get in touch by emailing us at info@todayandforever.co.za or call our friendly team on 083 609 9279. We can send you more moulding gel to have a second attempt.

A Note About Other Kits

Our kits include quick setting moulding gel because this type of product captures the best detail of your hands, including jewellery. Some kits that we have tested use lower quality SLOW SETTING GEL. While this gives you plenty of time to get it mixed and get your hands in the bucket, just remember that you may have to stay in position for up to 10 minutes! This is surprisingly hard to do and can be uncomfortable even for able-bodied people and almost impossible for younger children or elderly/frail relatives. Just be aware that the longer you must hold still and the more uncomfortable you become, the more you will end up moving your hands and this will result in a poor cast with lost detail like this:

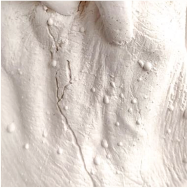
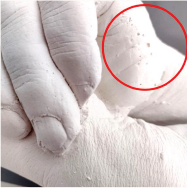
Problem 2 : Bubbles on the Skin Surface

A very common problem with hand casting kits is the appearance of unwanted small or even larger bubbles on the surface of your cast like this.

These bubbles are caused by air getting trapped in the moulding gel during mixing.

How to Avoid Bubbles on the Skin Surface

Mixing Make sure that the mould gel is mixed as thoroughly and smoothly as possible. As explained above, you can use colder water to allow yourself extra time to get it thoroughly mixed to eradicate any bubbles.

How to Fix It

You can carefully scrape away tiny bubbles using a suitable tool. Don’t try and flick them off as this will result in little craters on the skin surface. Our kits come with a wooden tool that can be used for small bubbles or you can use a craft knife or scalpel.

You should remove larger bubbles by gradually scraping them off. Do this carefully layer by layer until you reach the level of the skin surface. A craft knife or scalpel is best for this.

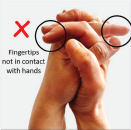
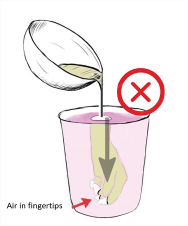
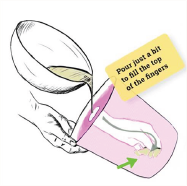
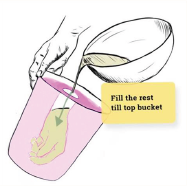
Problem 3 : Lost Fingertips

One of the most upsetting problems with hand casting kits occurs when air gets trapped in the fingertips in the mould that you’ve created. When this happens the liquid stone mixture won’t be able to reach the tips so you can end up with a cast that looks like this:

How to Avoid Losing Fingertips

Hand Position Make sure that fingertips are in contact with the other hand when you form the shape you’re going to dunk into the bucket. Fingertips that are ‘floating’ as shown below are hard to fill with the stone:

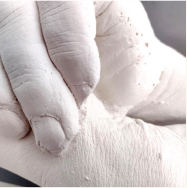
Plaster Pour To avoid getting air trapped in fingertips make sure you hold the mould at an angle when you first pour in the liquid stone, as shown here:

As an extra precaution, first just fill up to the fingertips, rotate the bucket to ensure the fingers are all coated, then tip the plaster back out into the bowl before filling your mould as instructed in the instructions.

How to Fix It

Just in case you still lose some fingertips, we recommend holding back a bit of stone powder before mixing it up so you can make repairs.

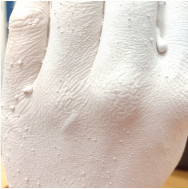
Problem 4 : Holes or Channels Skin Surface

It’s not unusual to have some tiny holes in the surface of the skin like those shown here:

These are caused by tiny air bubbles getting trapped in the stone liquid.

Occasionally, you may even have channels in the plaster like this:

These are caused by water separating from the stone powder during the setting process.

How to Avoid Holes or Channels in the Skin Surface

Mixing If you don’t spend enough time thoroughly mixing your stone it may start to separate during the pour. Make sure it’s thoroughly mixed for about 3 minutes until you’ve removed all lumps and it’s starting to slightly thicken.

Tapping You must keep tapping the bucket during the stone pour to release air from the liquid stone. Keep tapping at every stage of the pour and after you’ve filled the mould up to the top of the wrists. Take it in turns if it gets tiring but try to keep tapping both sides of the bucket until the liquid stone starts to thicken and then stop. This will bring all the bubbles to the surface and prevent the liquid stone from separating and forming channels.

How to Fix It

Hold back some of your stone powder (just a tablespoon full) in case you need to make some repairs. Mix equal parts of stone powder to water, then you can fill in the holes and channels.

Problem 5 : Black Dots Appearing on the Surface

Very occasionally we hear from customers who have started to see little black dots appearing on their hand casts in the days after making them. This is rare, but obviously upsetting if you think your cast is ruined, so here are our top tips:

How to Avoid Black Spots Appearing on your Hand Cast

Make sure you dry your cast out in a well-ventilated, dry place, ideally on a cooling rack (the type you use for baking). In cold weather, if you can put it next to a radiator that is ideal. Make sure air can flow all around the cast and turn it from time to time so that the base gets exposed as well.

How to Fix It

Apply a dab of slightly diluted bleach to the little spots using a cotton bud or white tissue. These should disappear very quickly.

Once the spots have been removed, place your casting in a dry and well ventilated space to dry for a further week.

If You Need More Help

We hope we have clearly explained all the most common problems with hand casting kits here. If you follow all of our top tips and watch our video, you should have a really positive hand casting experience! However, if you’ve used one of our kits and anything else goes wrong just give our customer care team a call on 083 609 9279 or send us an email to info@todayandforever.co.za and we’ll do everything we can to help. We’re here to hold your hand!